 Save
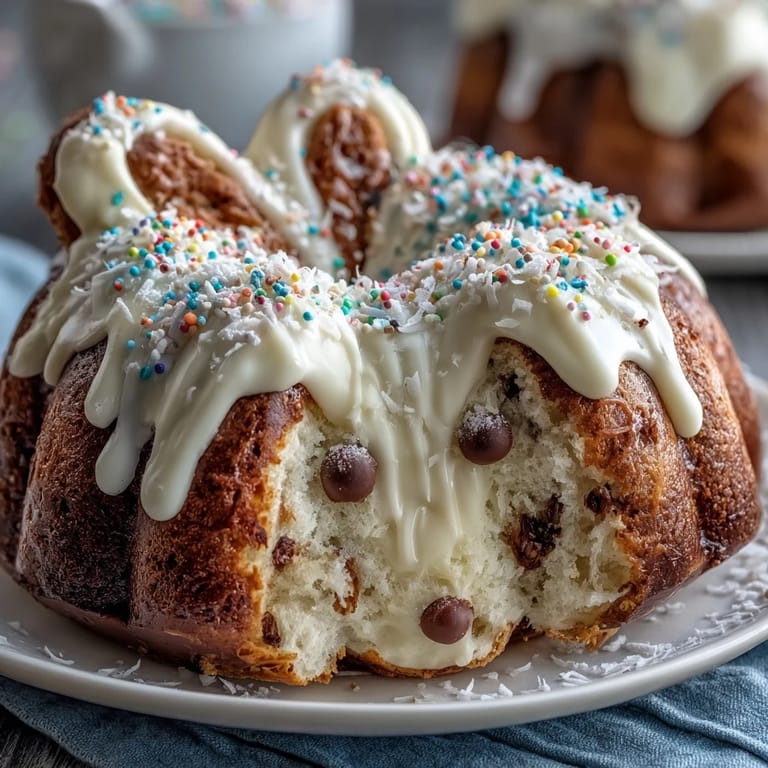
Save My daughter pressed her nose against the bakery window, mesmerized by a bunny-shaped cake with ears that actually stood up. That Easter, I decided to recreate it at home, and what started as an ambitious decoration project became the moment she learned that cakes could hold secrets inside. The hidden sprinkle center was supposed to be a simple surprise, but watching her slice into it and squeal with delight made every frosting smudge worth it. Now it's the cake everyone requests when spring arrives.
I remember standing in my kitchen at 6 AM on Easter Sunday, trying to coax marshmallow ears into staying upright while the frosting was still soft. My partner walked in, took one look at the lopsided bunny, and instead of laughing, suggested we lean into the imperfection and call it personality. That advice changed how I think about decorating cakes—perfection matters less than the story you're telling with it.
Ingredients
- All-purpose flour: Three cups gives you structure without being heavy; weigh it if you can because scooping can pack it down and throw off your ratios.
- Baking powder: Two and a half teaspoons is your leavening agent, and fresh baking powder makes a noticeable difference in how high the cake rises.
- Salt: Half a teaspoon balances the sweetness and enhances the vanilla flavor in ways you won't consciously notice but will definitely taste.
- Unsalted butter: One cup for the cake and another cup for frosting; softened butter creams better and incorporates air more evenly.
- Granulated sugar: Two cups is what makes the cake tender and gives it that delicate crumb structure.
- Eggs: Four large eggs at room temperature emulsify better with the butter and create a more cohesive batter.
- Vanilla extract: One tablespoon plus an extra teaspoon for frosting; use real vanilla if you can because it makes the cake taste less like a box mix.
- Whole milk: One cup brings moisture and keeps the cake from drying out, especially important since this cake sits on a board before serving.
- Assorted sprinkles: One cup for the hidden center; this is where you can be playful with colors and shapes.
- Powdered sugar: Four cups for the frosting needs to be sifted to avoid lumps that catch in your teeth.
- Food coloring: Optional pink coloring brings the bunny to life, and gel coloring doesn't thin out your frosting like liquid coloring does.
- Shredded coconut: Optional but transforms the bunny into something tactile and furry that kids love touching.
- Candy eyes and decorations: Pick these up a day early so you're not stressed about sourcing them last minute.
Tired of Takeout? 🥡
Get 10 meals you can make faster than delivery arrives. Seriously.
One email. No spam. Unsubscribe anytime.
Instructions
- Set up your workspace:
- Preheat your oven to 350°F and grease those two 8-inch round pans really well, getting into the corners and up the sides. I learned the hard way that a little extra butter or cooking spray in those pans prevents that heart-sinking moment when your cake tries to stick.
- Mix your dry ingredients:
- Whisk together the flour, baking powder, and salt in a bowl, and actually take a moment to whisk instead of just stirring; you're incorporating air and distributing the leavening agent evenly. This step takes two minutes and saves you from dense spots in your finished cake.
- Cream butter and sugar:
- In a large bowl, beat the softened butter and sugar together for about three minutes until it's genuinely light and fluffy, not just combined. This is where you're building the foundation for a tender crumb, so don't rush it even though you want to.
- Add eggs one at a time:
- Drop each egg in individually and let it fully incorporate before adding the next one; it takes longer but creates a more stable emulsion. Then mix in your vanilla extract until you smell that beautiful vanilla throughout the bowl.
- Alternate wet and dry ingredients:
- Add the flour mixture in three additions, alternating with the milk and starting and ending with flour; this prevents overmixing which would make your cake tough. Stir just until you don't see white streaks of flour anymore.
- Divide and bake:
- Split the batter evenly between your pans and smooth the tops with a spatula, then pop them into the oven for 35 to 40 minutes until a toothpick comes out clean. The kitchen will smell unbelievably good around minute 30, and that's your signal to start checking.
- Cool properly:
- Let the cakes rest in the pans for 10 minutes so they set enough to handle without falling apart, then turn them out onto wire racks to cool completely. Don't frost a warm cake or you'll end up with puddles.
- Create the surprise center:
- Once the cakes are fully cool, use a 3-inch round cutter to cut a hole in the center of one cake layer, which is easier than it sounds if you press straight down without twisting. You'll have a cake circle and a cake ring, and the circle becomes your seal.
- Build the hidden layer:
- Place the intact cake layer on your serving plate, spread a thin layer of buttercream on top, then add the cake layer with the hole. Fill that hole generously with sprinkles so every slice has that surprise, then cap it with the cake circle you cut out.
- Make your buttercream:
- Beat softened butter until it's creamy, then gradually add powdered sugar while mixing so you don't create a powdered sugar cloud in your kitchen. Once it's combined, add vanilla and milk a little at a time until it's spreadable.
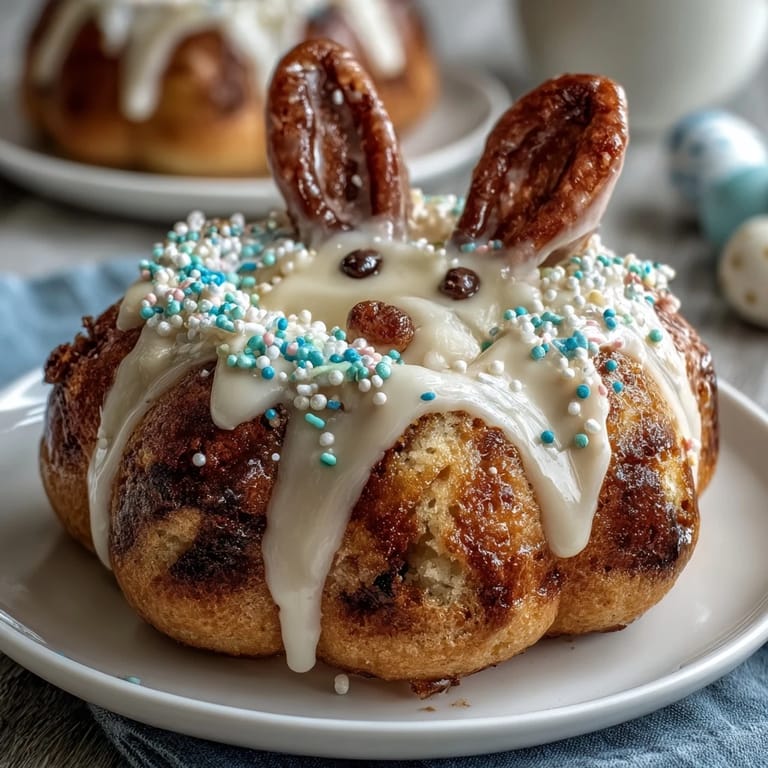
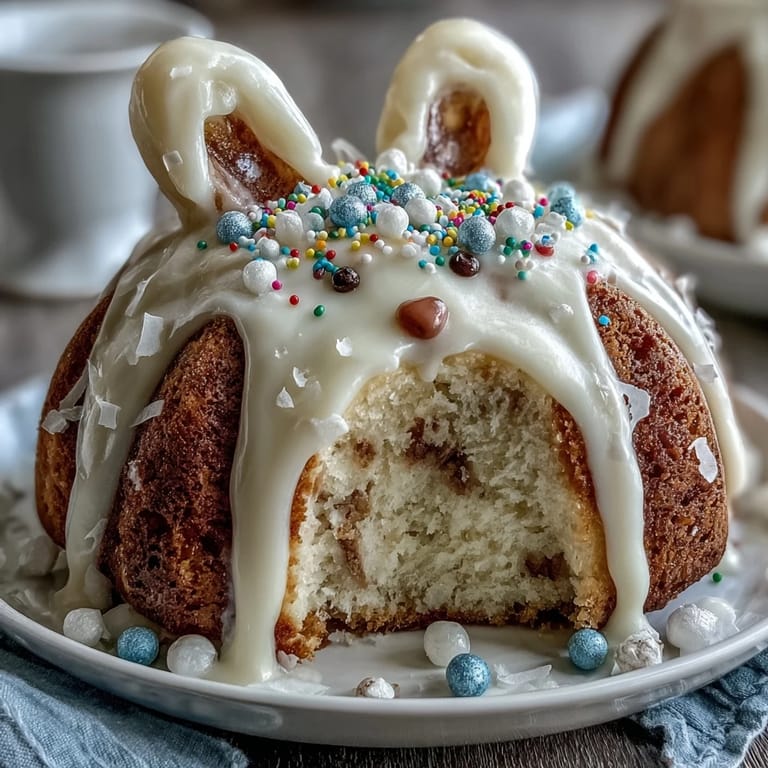
- Assemble your bunny:
- Frost the entire cake, then cut the second cake round strategically to create a face, two ears, and a bowtie, arranging everything on a large board. This is the part where your cake transforms into something sculptural.
- Decorate with intention:
- Use coconut for fur texture, candy eyes for personality, pink frosting or candies for the nose and ear details, and marshmallows for the fluffy tail. The decorating part is genuinely fun, especially if you have someone decorating alongside you.
- Chill before serving:
- Give the finished cake 30 minutes in the refrigerator so the frosting sets and the whole structure firms up slightly. This also lets you take a breath before people arrive.
 Save
Save I've watched this cake show up at three different Easter celebrations now, and each time someone cuts into it and finds those hidden sprinkles, the whole table goes quiet for a second before erupting into smiles. It's one of those rare moments where the cake is as much about the experience of eating it as it is about how it tastes.
Variations Worth Trying
A chocolate version works beautifully if your family leans that direction—swap half a cup of flour for half a cup of cocoa powder in the cake batter. I've also made a strawberry version by adding a quarter cup of strawberry puree to the batter and filling the center with crushed freeze-dried strawberries instead of sprinkles, which felt more sophisticated than colorful sprinkles but still delivered that surprise element. The flavors that pair well with the buttercream are pretty forgiving, so don't hesitate to experiment with your family's favorite flavors.
Shortcuts Without Shortcuts
If time is genuinely tight, a quality cake mix absolutely works and saves you 20 minutes of mixing and measuring—the decoration is what makes this cake special anyway, not the batter chemistry. I've used store-bought cakes a few times when I was running behind, and honestly, nobody noticed the difference once the bunny was assembled. The buttercream and decoration are worth your attention more than the cake base; that's where the magic happens.
Making It Picture Perfect
Use gel food coloring for the buttercream tinting because liquid coloring can make your frosting too wet and runny. If you want the marshmallow ears to stand upright, prop them with small pieces of dowel or pretzel sticks tucked into the frosting—nobody will know unless you tell them. The messiness is part of the charm, but here are three final touches that make it feel more polished.
- Chill the frosted cake for at least 30 minutes before decorating so the buttercream is firm enough that marshmallows and candy won't sink into it.
- Use an offset spatula to smooth the frosting on the sides, or just embrace the rustic look because both are genuinely adorable.
- Arrange your decorations on a large wooden board or cake base instead of a flat plate, which makes the bunny look more intentional and impressive.
 Save
Save This cake is less about perfect technique and more about celebrating the joy of gathering around something whimsical and delicious. Serve it with cold milk or lemonade and let the reveal of those hidden sprinkles be the highlight of your Easter table.
Recipe FAQs
- → How do I create the hidden sprinkle center?
Cut a 3-inch round hole in one cake layer, spread buttercream on the other layer, fill the hole with sprinkles, then seal with the cut-out cake piece.
- → Can I substitute any ingredients for dietary needs?
Butter can be replaced with plant-based alternatives for a dairy-free option, and gluten-free flour blends can substitute all-purpose flour if needed.
- → What’s the best way to decorate the bunny shape?
Use shredded coconut for fur texture, candy eyes for expression, and pink frosting or candies for the nose and ears, while marshmallows add playful tail details.
- → How long should the cake chill before serving?
Allow the decorated cake to chill for at least 30 minutes to help the frosting set and secure the hidden sprinkle center.
- → Can I make a chocolate variation?
Yes, replace half a cup of flour with cocoa powder for a rich chocolate flavor without affecting texture.