 Save
Save I still remember the first time I attempted a gingerbread house—it was a wobbly disaster that collapsed mid-assembly, sending my carefully baked panels tumbling across the kitchen counter. But instead of giving up, I learned that the magic wasn't in perfection; it was in the aroma of warming spices and the meditative process of building something festive with my own hands. Now, every holiday season, I create this gingerbread house frame as a beautiful centerpiece, and the process feels less like cooking and more like creating edible architecture that brings people together around the table.
I'll never forget watching my grandmother's eyes light up when she saw this gingerbread frame surrounding a platter of cookies at my first holiday dinner as an adult—she didn't eat a single piece from the house itself, but she pointed at it all evening, telling guests that I'd made it. That moment taught me that sometimes food is about creating a memory, not just satisfying hunger.
Ingredients
- All-purpose flour (300 g): This is your structural foundation—it gives the panels stability so they don't bend or warp during baking. I learned to measure by weight rather than cups because it's far more reliable when you're building something that needs to hold its shape.
- Brown sugar (100 g): Use a real, quality brown sugar; it brings a subtle molasses undertone that deepens the gingerbread flavor and makes the color richer than white sugar ever could.
- Unsalted butter, softened (100 g): The softness matters—if it's cold, your dough will be gritty and difficult to roll. Let it sit on the counter until it yields slightly when you press it.
- Molasses or dark honey (100 g): Molasses is the soul of gingerbread; it brings a dark, slightly bitter complexity that makes people say 'I can't quite place that flavor, but I love it.' If you only have light molasses, use it anyway—it's still wonderful.
- Large egg (1): This binds everything together and gives the dough structure. Room temperature eggs mix more smoothly and create a more even crumb.
- Ground ginger (1 tsp): Fresh is better than stale, so check your spice cabinet—if it's been open for more than a year, replace it. The difference in warmth and bite is noticeable.
- Ground cinnamon (1 tsp): This isn't just flavor; it's nostalgia in a spice jar. It's what makes people walk into your kitchen and smile before they even see the house.
- Ground cloves (½ tsp): A small amount goes a long way—cloves can overwhelm if you're not careful, but the right amount adds a sophisticated spice note that makes guests wonder what your secret is.
- Baking soda (½ tsp): This helps the dough rise slightly and creates that tender crumb that's easier to bite through than dense gingerbread.
- Salt (¼ tsp): It might seem tiny, but salt amplifies all the spice flavors and prevents the sweetness from becoming one-dimensional.
- Egg white (1): For the royal icing, use a fresh, clean egg white—any yolk will prevent the icing from reaching stiff peaks.
- Powdered sugar, sifted (200 g): Sifting removes lumps and creates smooth, thick icing that holds its shape when piped. It's a small step that makes a huge difference.
- Lemon juice (½ tsp): A tiny bit brightens the icing and helps it set properly, and it prevents the sweetness from being cloying.
- White chocolate, melted (50 g): This is your decorative glue and detail work—it sets quickly and looks beautiful drizzled in delicate lines across the gingerbread panels.
- Assorted candies: Chocolate buttons, white sprinkles, and mini marshmallows are my go-to decorations, but truly, whatever fits your color scheme and kitchen supplies will work beautifully.
Tired of Takeout? 🥡
Get 10 meals you can make faster than delivery arrives. Seriously.
One email. No spam. Unsubscribe anytime.
Instructions
- Cream the butter and sugar together:
- In a large bowl, combine your softened butter and brown sugar. Use an electric mixer on medium speed and beat for about 2-3 minutes until the mixture is light, fluffy, and noticeably paler than when you started. This creaming process incorporates tiny air bubbles that make your gingerbread tender rather than dense. Stop occasionally to scrape down the bowl so everything gets fully combined.
- Introduce the wet ingredients:
- Add your egg to the butter mixture and beat until completely incorporated—the mixture might look slightly broken at first, but keep going until it comes together. Pour in the molasses slowly while mixing, and watch as the dough transforms into a rich, dark, glossy mixture. This is when your kitchen starts to smell like everything good about the holidays.
- Combine your dry ingredients:
- In a separate bowl, whisk together your flour, ginger, cinnamon, cloves, baking soda, and salt. Whisking the dry ingredients together ensures the spices distribute evenly throughout the dough so every bite tastes consistent—you won't end up with some pieces that are overly spiced and others that taste bland.
- Merge wet and dry:
- Add the dry mixture to your wet ingredients gradually, stirring gently with a wooden spoon or mixing on low speed. The dough will come together slowly—don't rush it. Mix until everything is just combined and no dry flour streaks remain. This dough should feel firm but workable.
- Chill for patience and structure:
- Wrap your dough in plastic wrap and refrigerate for at least 30 minutes—I usually leave mine for an hour or even overnight. Cold dough is easier to roll and holds its shape better when you're cutting out house panels. This waiting period is when you can pour yourself a hot drink and admire what you're about to create.
- Prepare your workspace:
- Preheat your oven to 180°C (350°F) and line a large baking sheet with parchment paper. This prevents sticking and ensures even browning on the bottom of your pieces.
- Roll and cut with intention:
- Lightly flour your work surface and rolling pin. Roll the chilled dough to about 5 mm thickness—this is thin enough to be crispy but thick enough to be strong enough to build with. Using templates or a knife, carefully cut out your house panels: two rectangles for the front and back, two for the sides, and two for the roof. Make each panel roughly 10-12 cm wide so your house frame has proper proportions. A tip I learned the hard way: make your pieces slightly larger than you think you need—they shrink a tiny bit during baking.
- Bake until edges signal doneness:
- Place your cut panels on the prepared baking sheet and bake for 10-12 minutes. Watch for the edges to turn golden and feel just firm to the touch—they should still be slightly flexible, not rock-hard. Overbaking makes them brittle and prone to breaking during assembly.
- Cool completely on the rack:
- Transfer the baked panels to a wire rack and let them cool completely at room temperature. This usually takes about 20-30 minutes. Don't rush this step—warm pieces will snap when you try to assemble them. Complete cooling also ensures your pieces maintain their shape.
- Prepare your royal icing adhesive:
- In a clean bowl, beat your egg white on medium speed until soft peaks form—the mixture should be foamy and hold a soft peak when you lift the beater. Gradually add your sifted powdered sugar a little at a time, beating continuously. The mixture will transform from thin to thick. Add the lemon juice and beat until you reach a consistency that's thick enough to hold its shape but still spreadable—it should look glossy and smooth.
- Assemble with architectural care:
- This is the most delicate part. Use royal icing as your edible glue. Apply a thin line of icing along the edges of your panels where they'll connect. Press two panels together gently, holding them for about 30 seconds until the icing begins to set. Build gradually—create the walls first, then attach the roof panels. Stand back occasionally to check that everything is reasonably level and square. This assembly usually takes 10-15 minutes, and you'll likely feel a flutter of satisfaction as your structure takes shape.
- Allow adequate drying time:
- After assembly, let your gingerbread house sit undisturbed for at least 30 minutes, preferably an hour. The royal icing needs time to fully harden and bind the panels together securely. During this time, you can prepare your decorations and relax knowing the hard part is almost done.
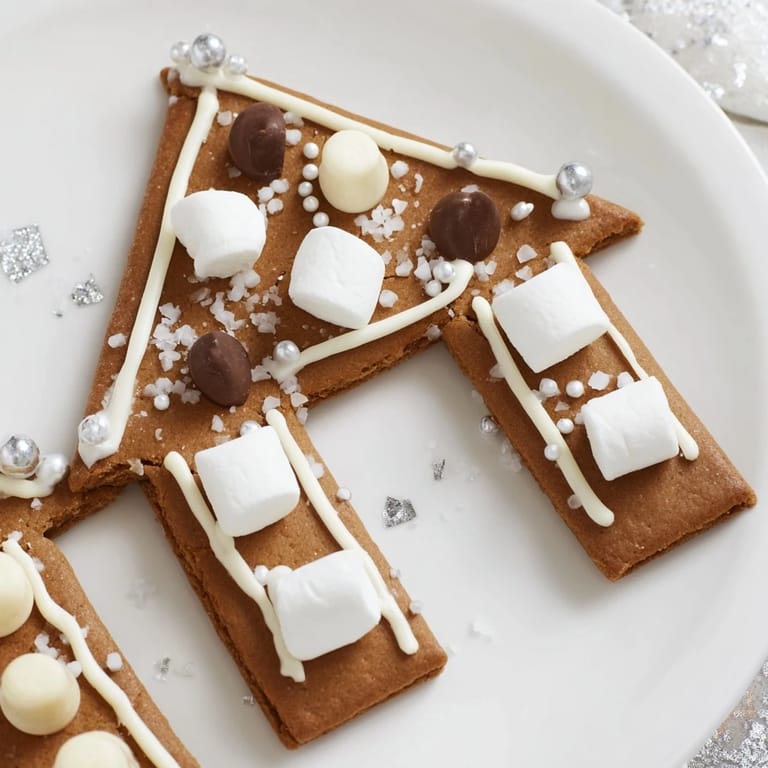
- Decorate with artistic flourish:
- Once the structure feels sturdy, it's time for the fun part. Drizzle melted white chocolate in decorative patterns across the panels. Use royal icing to glue on your candies—chocolate buttons along the roof edges, white sprinkles as snow, mini marshmallows nestled in corners. Let your imagination guide you. This is when the house transforms from architectural achievement to holiday showpiece.
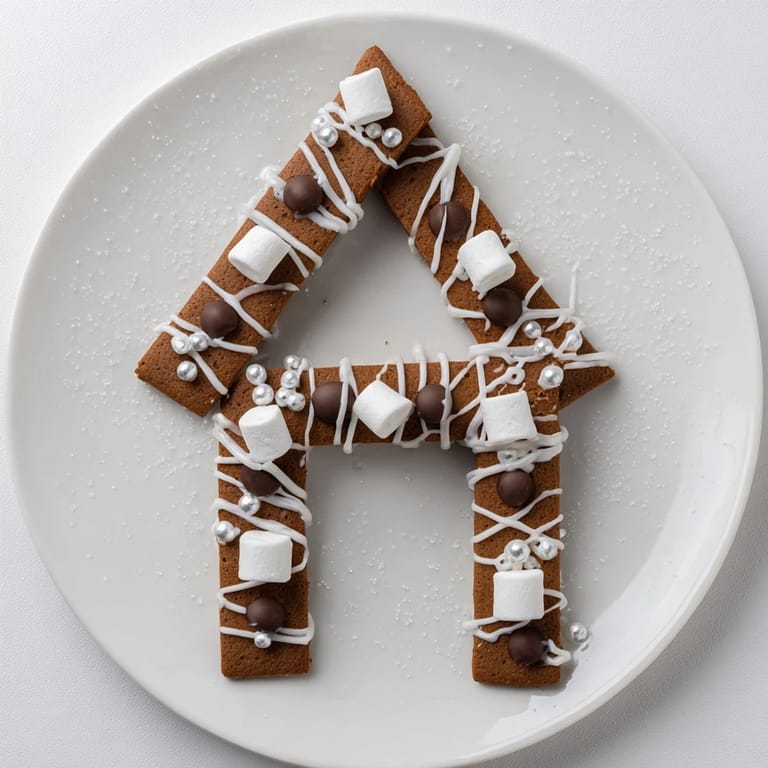
- Complete the final presentation:
- Place your finished gingerbread house frame on a serving platter and arrange additional cookies, nuts, or holiday treats around it. The frame should create a charming border that invites guests to nibble on the goodies while admiring the centerpiece. Step back and feel proud of what you've created.
 Save
Save The moment a young neighbor walked past my kitchen window and asked if I had built a real house inside made me realize this isn't really about creating a dessert—it's about creating wonder. That's when I understood why this recipe means so much to me: it's permission to build something impractical and beautiful in a world that often demands efficiency.
Creating Your Gingerbread Architecture
Building a gingerbread house frame is as much about the meditative process as it is about the result. The act of rolling dough, cutting shapes, and carefully assembling them teaches patience in a way that quick recipes never do. I've found that the imperfections—the slightly tilted roof line, the candy that's not quite centered—are what make it charming and personal. Every house frame tells the story of whoever built it, and that's far more valuable than perfection.
Spice Blending and Flavor Development
The spice combination in this recipe is deliberately balanced—ginger provides warmth, cinnamon adds sweetness, and cloves bring sophistication. These three spices have worked together in baking for centuries, and there's wisdom in respecting that tradition. The molasses acts as a base that anchors all these flavors, preventing them from being sharp or one-dimensional. If you've tasted gingerbread that seemed flat or overwhelming, the issue was usually either stale spices or the wrong ratio. This recipe's proportions have been tested enough times that they create harmony.
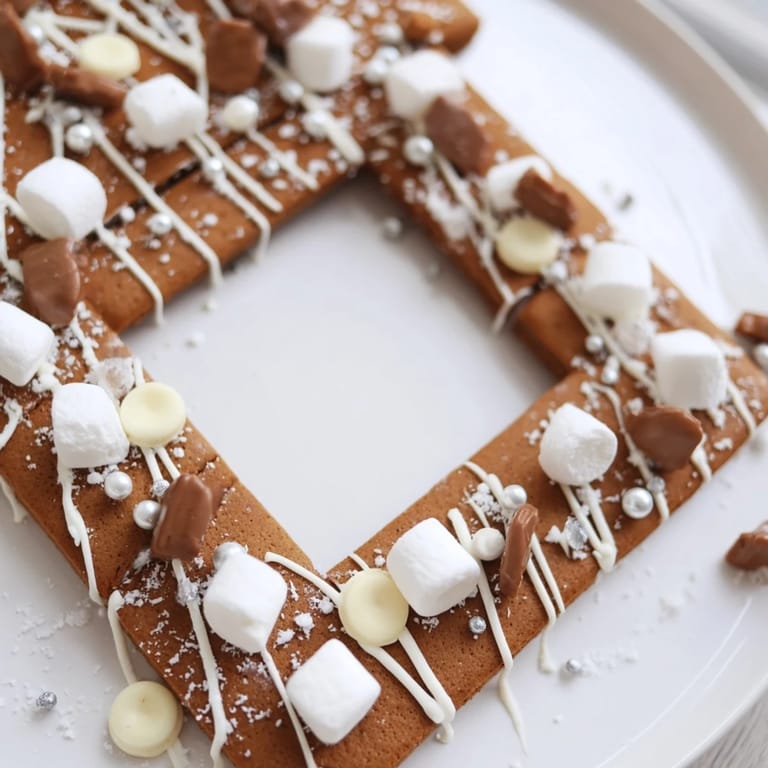
Display and Serving Suggestions
A gingerbread house frame truly shines when it's the centerpiece of a holiday spread. Position it where light can play across the white chocolate drizzles and candy decorations—a slightly elevated spot on your table draws all eyes to it. Pair it with hot chocolate, mulled wine, or strong coffee for a cozy gathering. The frame itself can be enjoyed in small pieces as guests pass by, and the cookies arranged around it provide additional options for sampling. The beauty of this format is that it creates an edible border that's less commitment than a full house but equally impressive.
- Serve alongside cookies or petit fours arranged in a casual, inviting circle around the house frame.
- Have small forks or serving utensils nearby so guests can break off pieces without using their hands.
- Keep it away from direct heat sources and humid areas, as the royal icing and white chocolate can become sticky or weep.
 Save
Save This gingerbread house frame is proof that some of the most memorable things we create in the kitchen aren't necessarily complicated—they just require a little planning and a willingness to slow down. Make it this season, and I promise it will become a tradition.
Recipe FAQs
- → What spices are used in the dough?
Ground ginger, cinnamon, and cloves provide warm, aromatic flavors typical of gingerbread.
- → How do I ensure the panels hold together securely?
Use royal icing as an edible glue, applying generous amounts at the joints and allowing at least 30 minutes to dry fully for stability.
- → Can I prepare the dough in advance?
Yes, chilling the dough for at least 30 minutes improves handling, and baking panels a day before assembly enhances sturdiness.
- → What decorations complement the gingerbread frame?
Melted white chocolate drizzles, white and brown candies, sprinkles, mini marshmallows, and edible glitter create a festive look.
- → Are there alternatives for royal icing?
You can switch royal icing with a vegan alternative if dietary preferences require it, ensuring it still acts as a strong adhesive.
- → What tools are needed for assembly?
A piping bag for icing, rolling pin, baking sheet, parchment paper, and a gingerbread house template or knife aid precise shaping and assembling.