 Save
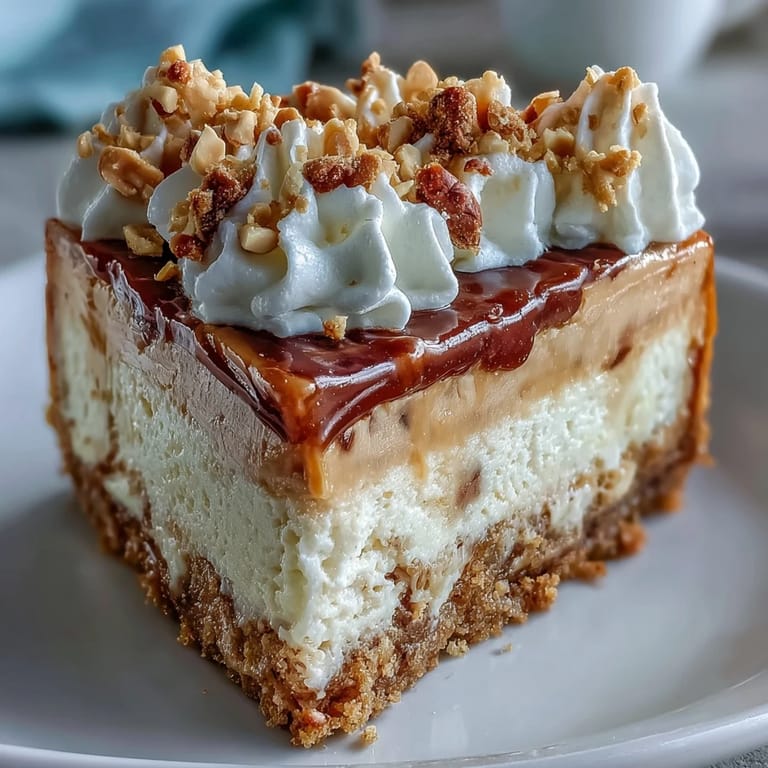
Save One Sunday afternoon, I opened my pantry looking for something quick to snack on and spotted a sleeve of Nutter Butters tucked behind the cereal. Instead of eating them straight from the package, I started wondering what would happen if I turned them into a crust. That idle thought spiraled into this cheesecake, a dessert so rich and peanut buttery that it disappeared from my counter faster than any cake I had ever made. The combination of creamy filling, crunchy base, and sweet whipped topping felt like something I had been craving without knowing it. Now, whenever I need a showstopper dessert that does not require exotic ingredients, this is the one I reach for.
I made this cheesecake for a potluck once, and three people asked for the recipe before I even cut the second slice. One friend admitted she had never been a cheesecake person until she tried this version, and another came back for thirds with zero shame. Watching people light up over something I baked in my own kitchen reminded me why I love sharing food. It was not fancy plating or perfect swirls that won them over, just the honest comfort of peanut butter and cream cheese doing what they do best.
Ingredients
- Nutter Butter cookies: These form the base and bring that signature peanut butter flavor into every forkful, crush them finely so the crust holds together without crumbling.
- Unsalted butter: Melted butter binds the cookie crumbs and adds richness, make sure it is fully melted so it coats every crumb evenly.
- Cream cheese: The foundation of any great cheesecake, softened cream cheese blends smooth and prevents lumps in your batter.
- Granulated sugar: Sweetens the filling without overpowering the peanut butter, measure it level for balanced sweetness.
- Vanilla extract: A small splash deepens the flavor and rounds out the richness of the cream cheese.
- Eggs: They give the cheesecake structure and that signature dense, creamy texture we all crave.
- Creamy peanut butter: This is where the magic happens, use a smooth, well stirred variety so it blends seamlessly into the batter.
- Heavy whipping cream: Whipped with powdered sugar, it creates a cloud like topping that balances the dense filling below.
- Powdered sugar: Sweetens and stabilizes the whipped cream without adding graininess.
- Chopped peanuts: Optional but highly recommended for a salty crunch that cuts through all that creamy sweetness.
Tired of Takeout? 🥡
Get 10 meals you can make faster than delivery arrives. Seriously.
One email. No spam. Unsubscribe anytime.
Instructions
- Prep your pan:
- Preheat your oven to 325 degrees F and line the bottom of a 9 inch springform pan with parchment paper, then grease the sides lightly. This small step makes releasing the cheesecake later almost foolproof.
- Build the crust:
- Mix crushed Nutter Butter cookies with melted butter until the mixture looks like wet sand and holds together when pressed. Press it firmly into the bottom of your pan using the back of a measuring cup, then bake for 10 minutes and let it cool completely.
- Beat the base:
- In a large bowl, beat softened cream cheese and granulated sugar with an electric mixer on medium speed until the mixture is smooth and fluffy, about 2 to 3 minutes. Scrape down the sides of the bowl as you go to ensure everything blends evenly.
- Add the peanut butter:
- Mix in vanilla extract and creamy peanut butter until fully incorporated and the batter turns a beautiful golden tan. Do not rush this step, you want every spoonful to taste like peanut butter heaven.
- Fold in the eggs:
- Add eggs one at a time on low speed, mixing just until each one disappears into the batter. Overmixing at this stage can introduce too much air and lead to cracks on the surface.
- Pour and smooth:
- Pour the cream cheese mixture over your cooled crust and use a spatula to smooth the top into an even layer. Tap the pan gently on the counter a few times to release any trapped air bubbles.
- Bake low and slow:
- Bake for 50 to 60 minutes, until the edges are set but the center still has a slight jiggle when you shake the pan. The residual heat will finish cooking the middle as it cools.
- Cool it down:
- Turn off the oven, crack the door open, and let the cheesecake sit inside for 1 hour. This gradual cooldown helps prevent those dreaded cracks from forming on top.
- Chill completely:
- Remove the cheesecake from the oven and refrigerate it for at least 4 hours, or overnight if you have the patience. The flavors deepen and the texture firms up beautifully with time.
- Whip the topping:
- Before serving, whip heavy cream with powdered sugar until stiff peaks form and the cream holds its shape. Spread it generously over the chilled cheesecake like you are frosting a cake.
- Garnish and serve:
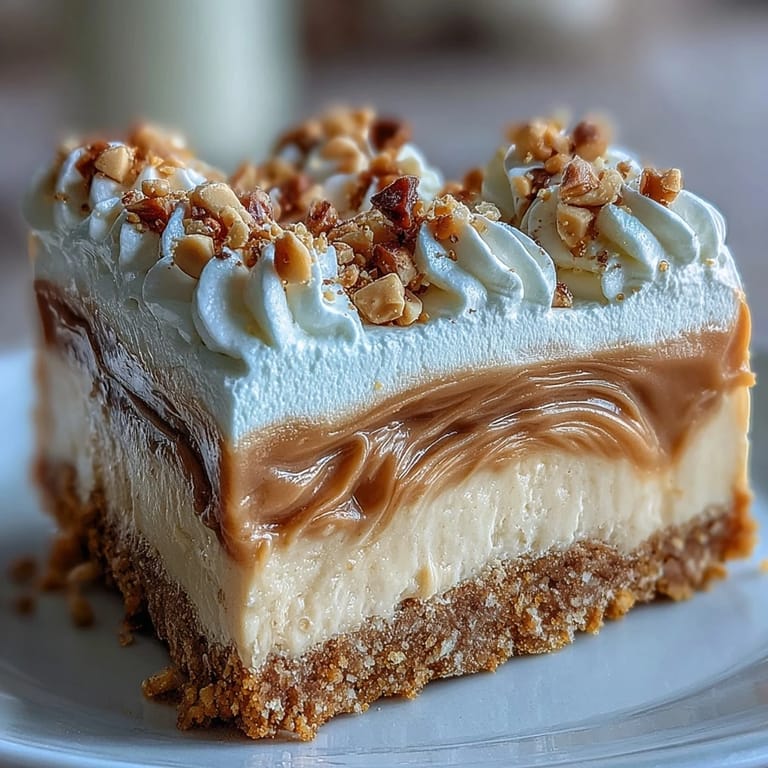
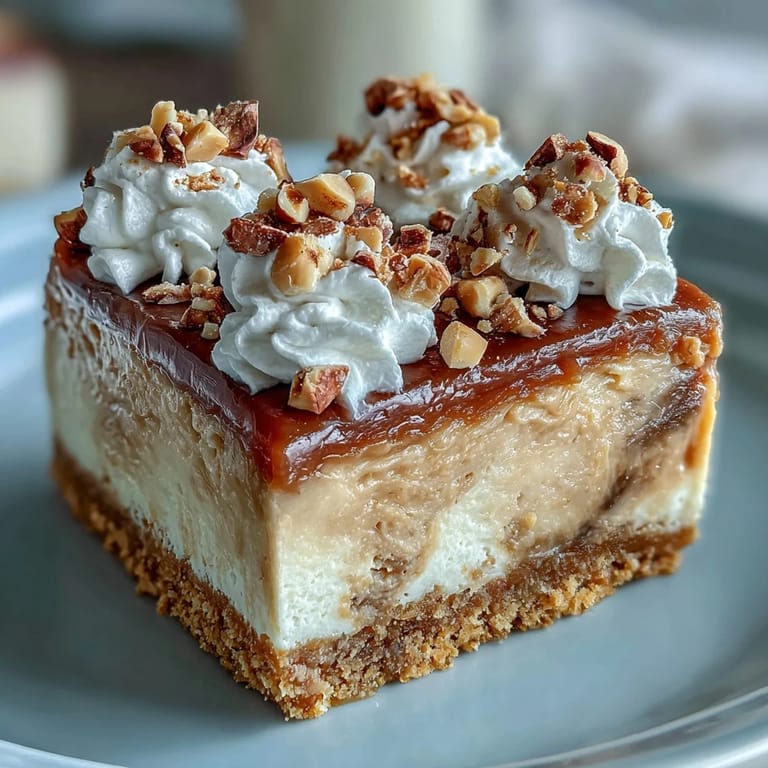
- Sprinkle chopped peanuts and extra Nutter Butter cookies on top for crunch and visual appeal. Slice with a warm, clean knife for the neatest pieces.
 Save
Save The first time I sliced into this cheesecake after it had chilled overnight, the knife glided through like butter and the layers held their shape perfectly. My kitchen smelled like a peanut butter dream, and I felt that quiet pride you get when something turns out even better than you hoped. Sharing it with friends turned a regular weeknight into a mini celebration, proof that dessert has a way of making ordinary moments feel special.
How to Store Leftovers
Cover the cheesecake tightly with plastic wrap or store it in an airtight container in the refrigerator for up to 5 days. The whipped cream topping will soften slightly over time, but the flavor only gets better as the peanut butter and cream cheese meld together. If you want to freeze it, wrap individual slices in plastic wrap and then in foil, and they will keep for up to 2 months. Thaw slices in the fridge overnight before serving, and add fresh whipped cream if the original topping does not hold up.
Serving Suggestions
This cheesecake shines on its own, but a drizzle of warm chocolate or caramel sauce takes it over the top. I have also served it with a handful of fresh berries on the side to cut through the richness, and the tartness of raspberries pairs beautifully with peanut butter. For a fun twist, crumble a few extra Nutter Butters on each plate right before serving so every bite has a little extra crunch. A cold glass of milk or a strong cup of coffee makes the perfect companion.
Common Mistakes to Avoid
One mistake I made early on was not letting the cheesecake cool gradually, and I ended up with a giant crack right down the middle. Rushing the chilling process is another pitfall, because the texture will not set properly if you slice it too soon. Overmixing the batter after adding the eggs incorporates too much air, which can cause the top to puff up and then collapse.
- Always use a springform pan, regular cake pans make it nearly impossible to remove the cheesecake in one piece.
- Do not skip the parchment paper on the bottom, it is your best friend when it comes time to release the cake.
- Measure your peanut butter carefully, too much can make the filling heavy and dense instead of creamy.
 Save
Save This cheesecake has earned a permanent spot in my dessert rotation, and I hope it does the same for you. There is something deeply satisfying about pulling a homemade cheesecake out of the fridge and watching it disappear, one happy slice at a time.
Recipe FAQs
- → How long should I refrigerate the cheesecake?
Refrigerate for at least 4 hours, though overnight is recommended for the best texture and flavor development.
- → Can I use a water bath?
Yes, baking in a water bath creates an even creamier texture and helps prevent cracks from forming on the surface.
- → How do I know when the cheesecake is done?
The edges should be set while the center remains slightly jiggly. It will firm up further during cooling.
- → Can I make this ahead of time?
Absolutely. In fact, making it a day ahead allows the flavors to meld and the texture to become perfectly creamy.
- → What if I don't have a springform pan?
You can use a regular 9-inch cake pan lined with parchment paper, though removing slices will be trickier.