 Save
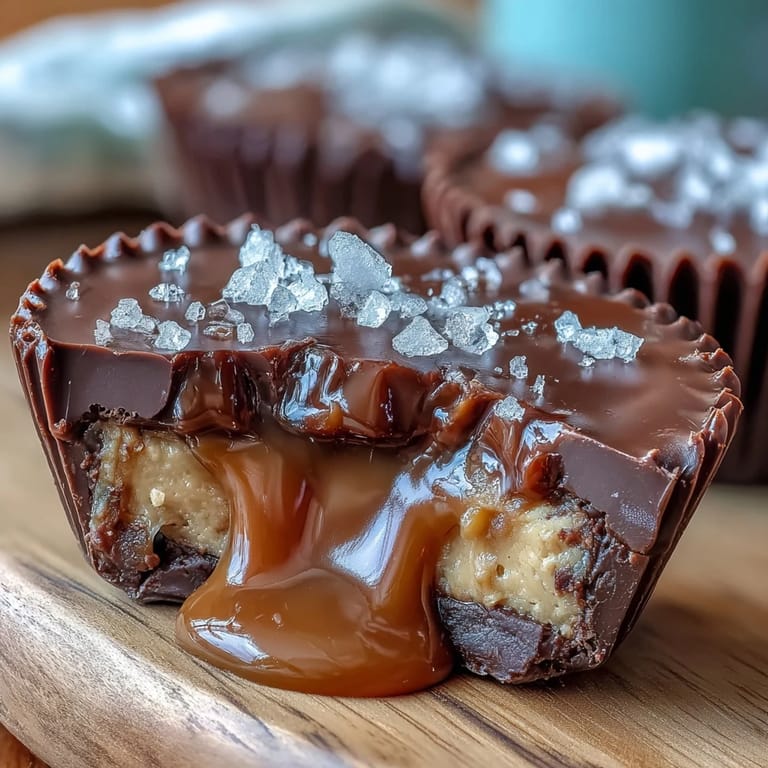
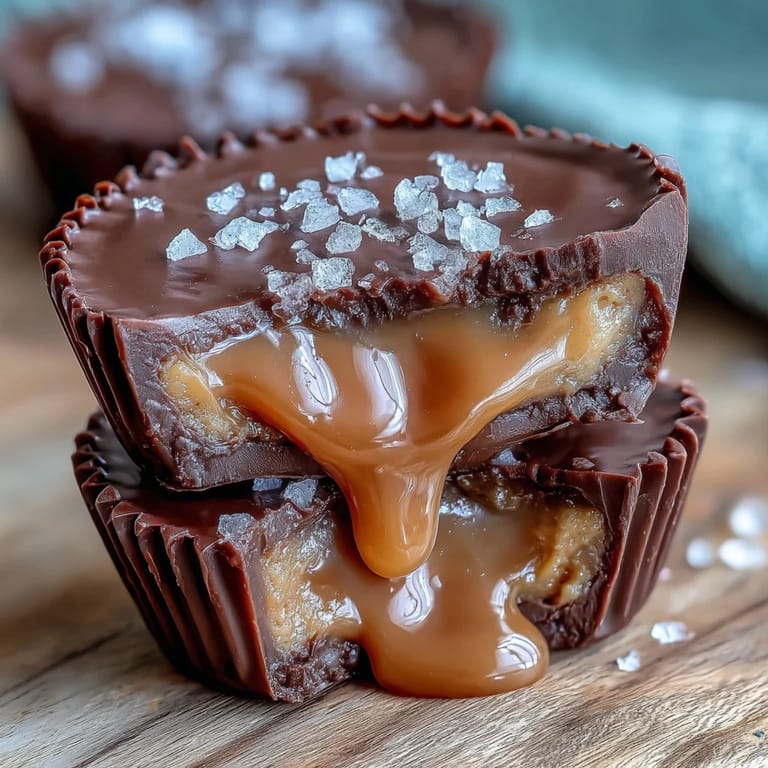
Save My kitchen smelled like burnt sugar the first time I attempted homemade caramel, but something about that bitter-sweet mistake made me determined to master it. Years later, when a friend mentioned missing those fancy peanut butter cups from specialty shops, I realized I could recreate them with that caramel I'd finally learned to control. The combination of gooey salted caramel, creamy peanut butter, and dark chocolate felt like an edible apology to my younger self for every failed candy attempt. What started as a weekend experiment became the thing people actually request now.
I made these for my neighbor during a particularly rough month, and watching her face light up when she bit into one felt like the best thing I'd accomplished all year. She came back three days later asking if I could teach her, and we spent a Sunday afternoon in her kitchen, laughing at my terrible caramel-swirling technique while hers turned golden on the first try. That's when I realized these cups had become more than candy, they were conversation starters.
Ingredients
- Semisweet or milk chocolate, 300 g chopped or chips: The quality here genuinely matters because chocolate is the star player, not a supporting role.
- Coconut oil or unsalted butter, 2 tbsp: This keeps the chocolate thin enough to coat without seizing, and coconut oil creates a slightly snappier shell.
- Creamy peanut butter, 120 g: Don't use the natural kind that separates unless you enjoy a grainy texture, stick with the conventional stuff for this application.
- Powdered sugar, 2 tbsp: This sweetens and lightens the peanut butter filling without adding moisture.
- Unsalted butter for filling, 1 tbsp softened: Softened means room temperature, not melted, so your filling stays sturdy enough to hold its shape.
- Vanilla extract, ½ tsp: A small amount that whispers rather than shouts, rounding out the peanut flavor.
- Granulated sugar for caramel, 100 g: Watch this transform from white to amber and you'll understand why patience matters in candy making.
- Unsalted butter for caramel, 2 tbsp: Separate from the filling butter, this enriches the caramel with serious depth.
- Heavy cream, 60 ml: The cream will bubble dramatically when it hits the hot caramel, which is exactly what should happen.
- Fine sea salt for caramel, ¼ tsp: This dissolves into the caramel and balances the sweetness from within.
- Flaky sea salt for topping: This stays on top as visible crystals, giving you that textural contrast and final salty punch.
Tired of Takeout? 🥡
Get 10 meals you can make faster than delivery arrives. Seriously.
One email. No spam. Unsubscribe anytime.
Instructions
- Line your muffin tin with paper liners:
- Arrange 12 liners in a standard muffin tin, pressing them gently into place so they stay upright while you work.
- Melt the chocolate gently:
- Whether you choose a double boiler or microwave method, the key is not rushing it, stirring every 30 seconds if microwaving to prevent any burnt spots. Chocolate seizes from moisture or heat, so keep things low and slow.
- Coat the bottom of each cup:
- Spoon about a tablespoon of melted chocolate into each liner, then tilt and rotate the tin so the chocolate climbs up the sides evenly. You're creating a chocolate shell, not drowning it.
- Chill the chocolate base:
- Ten minutes in the freezer sets the chocolate firm enough to hold the filling without cracking when you add the next layer.
- Make the peanut butter filling:
- Combine the peanut butter, powdered sugar, softened butter, and vanilla in a bowl, mixing until completely smooth and uniform. Divide into 12 equal portions and flatten each into a small disc about the size of a coin.
- Create the salted caramel:
- Pour the sugar into a heavy-bottomed saucepan over medium heat and let it sit undisturbed for a minute, then swirl gently as it melts into a golden amber color. Once it reaches that amber stage, add the butter and stir constantly, then slowly pour in the cream while whisking to incorporate it smoothly.
- Season and cool the caramel:
- Stir in the fine sea salt while the caramel is still hot, then remove from heat and let it cool for about 10 minutes so it thickens slightly but stays pourable.
- Assemble the layers:
- Place one peanut butter disc on top of each chilled chocolate base, then top with about a teaspoon of the cooled caramel, spreading it gently to cover.
- Cover with final chocolate layer:
- Spoon the remaining melted chocolate over each filled cup, using the back of the spoon to smooth the tops so they look finished and polished.
- Add the flaky salt finish:
- While the chocolate is still slightly soft, sprinkle a few flakes of sea salt on top of each cup for that signature sweet and salty contrast.
- Final chill until set:
- Refrigerate for at least 30 minutes until the chocolate is completely firm and the cups hold their shape when you pick them up.
 Save
Save There's something meditative about swirling sugar in a pan, watching it transform from granules to liquid gold, trusting that the heat will do its work without intervention. My hands were shaking the first time I poured cream into my caramel, convinced I'd ruin everything, but that gentle bubbling and subsequent silkiness taught me that following the process matters more than perfection.
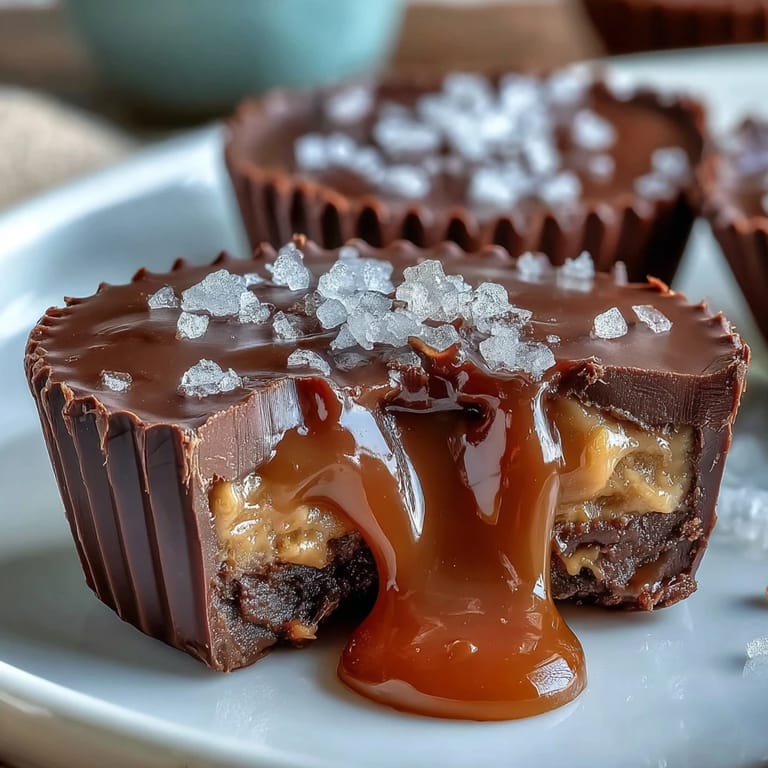
Storing Your Peanut Butter Cups
These cups keep beautifully in an airtight container in the refrigerator for up to a week, though they rarely last that long in my house. The chocolate stays snappy and the caramel maintains its chewy texture, making each bite as satisfying as the first one. If you're storing them in warm weather, keep them toward the back of the fridge away from the door where temperatures fluctuate.
Flavor Variations Worth Exploring
Once you've mastered the classic version, these cups become a canvas for creativity. I've experimented with swapping half the peanut butter for almond butter, which gives a more delicate flavor, and adding a pinch of cinnamon to the caramel creates an almost autumn-spiced warmth. Some friends prefer sunflower seed butter for a nut-free option that works equally well, and one memorable attempt involved adding a tiny pinch of espresso powder to the chocolate layer, which deepened everything beautifully.
The Science and Spirit of Homemade Candy
Making candy from scratch teaches you something about patience that modern cooking often doesn't require. You can't rush the caramel or shortcut the chilling time, and honestly, there's something grounding about respecting those timelines in a culture that usually celebrates speed. These cups remind me that some of the best things in life require you to show up, pay attention, and trust the process.
- Double-check your cream is truly heavy cream and not half-and-half, as this affects the caramel's consistency and richness.
- If the caramel seems too thin after cooling, it probably needs another minute or two in the fridge to thicken up before assembly.
- These make exceptional gifts when packaged in a simple box with parchment between layers, and homemade always means more than store-bought.
 Save
Save These homemade cups taste like care, and that's the ingredient no store-bought version can replicate. Make them once and you'll understand why people ask for the recipe.
Recipe FAQs
- → How do I prevent chocolate from seizing when melting?
Use gentle heat like a double boiler or short microwave bursts and stir frequently to keep chocolate smooth without overheating.
- → Can I use almond or sunflower seed butter instead of peanut butter?
Yes, almond or sunflower seed butter can replace peanut butter for those with nut allergies, keeping a similar texture and flavor balance.
- → What is the best way to get a smooth salted caramel sauce?
Slowly melt the sugar without stirring, then blend in butter and cream while whisking to create a silky, lump-free caramel. Cool before use.
- → How long should the cups chill before serving?
Chill the cups in the refrigerator for at least 30 minutes to ensure the layers set firmly and hold their shape.
- → What does the flaky sea salt add to the cups?
Flaky sea salt provides a crunchy texture contrast and enhances the overall flavor by balancing sweetness with a touch of saltiness.